Summary
Whether you’re diving into your first biology project or setting up a new lab, cell culture is a foundational technique in the life sciences. This comprehensive guide introduces the essentials of cell culture, from its origins and purpose to protocols, troubleshooting, and expert tips.
Bonus: A one-page printable PDF protocol is available at the end of this guide—perfect for quick reference at the bench.
Table of Contents
What is cell culture?
Cell culture, a cornerstone of modern biology, has fascinating beginnings. In 1907, Ross Granville Harrison pioneered the technique by cultivating nerve cells from frog embryos. Alexis Carrel later sustained chicken heart tissue in culture for over 30 years, showcasing sterile technique and continuous feeding. But the true revolution came in 1951 with the HeLa cell line, immortalized cervical cancer cells from Henrietta Lacks, enabling decades of biomedical breakthroughs.
Cell culture is the process of growing cells outside their natural environment under controlled lab conditions. Cells, usually from animal or human tissues, are grown in flasks or dishes using nutrient-rich media. Cell culture is indispensable in research and industry because it allows scientists to grow, manipulate, and analyze cells in a highly controlled setting. This enables:
- Studying biological processes (e.g., signaling, proliferation)
- Producing biologics (proteins, antibodies, vaccines)
- Drug testing (toxicity, efficacy)
- Disease modeling and therapeutic screening.
By using cultured cells, researchers can eliminate confounding variables found in whole organisms and generate reproducible, scalable data.
Types of cell culture
- Adherent cells: Require a surface to grow (e.g., fibroblasts)
- Suspension cells: Grow freely in medium (e.g., lymphocytes)
- Primary cells: Freshly isolated, limited divisions
- Cell lines: Immortalized for continuous growth
Cells can grow in suspension or as adherent cultures, proliferating either as a homogeneous population or forming clones and clusters within the vessel. Cell populations are typically monitored using cell count or cell density (expressed as cells per mL for suspension cultures or cells per cm² for adherent cultures), or by confluency, which represents the percentage of surface area covered by cells in adherent cultures.
Basic cell culture workflow
- Initiation – Thawing or isolating cells from tissue
- Expansion – Growing cells to reach desired confluency
- Maintenance – Regular feeding and passaging
- Experimentation – Assays, imaging, treatments
- Cryopreservation – Long-term storage in liquid nitrogen

What you need to get started
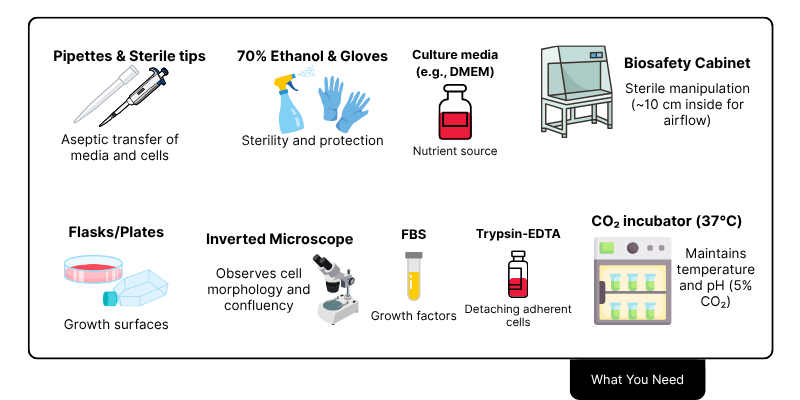
- Why is fetal bovine serum used in cell culture?
Fetal bovine serum (FBS) is widely used in cell culture as a supplement because it provides essential growth factors, hormones, proteins, and nutrients that support cell survival, attachment, and proliferation. Its composition is particularly favorable due to low levels of antibodies and a rich mix of components that promote consistent cell growth. While effective, FBS use raises ethical and variability concerns, and serum-free or chemically defined media are increasingly used as alternatives for specific cell types or applications.
- What is l-glutamine and why is it important for cell culture?
L-glutamine is a critical amino acid in cell culture media, serving as a major energy and nitrogen source necessary for cell growth, protein synthesis, and nucleotide production. However, it is unstable in solution and degrades into ammonia, which can harm cells. To address this, more stable alternatives like GlutaMAX (a dipeptide form of glutamine) are available and commonly used to improve media shelf life and reduce toxicity.
Quick Tips
- Wipe surfaces with 70% ethanol
- Pre-warm media to 37°C
- Arrange sterile workflow logically
Thawing and Seeding Cells
Most cells are cryopreserved in DMSO and stored in liquid nitrogen. Follow this protocol to ensure cell viability:
- Pre-warm a water bath to 37°C
- Thaw in water bath for 1–2 min; a tiny ice crystal should remain to prevent full DMSO exposure
- Transfer contents to a 15 mL tube with 10 mL pre-warmed media (dilutes DMSO to ~0.1%)
- Centrifuge at 300g for 5 min, to form a cluster of cells at the bottom of the tube (pellets)
- Discard supernatant, resuspend pellet, and seed into a flask at ~30–40% confluency
Quick Tips
- DMSO is toxic, remove promptly
- High initial confluency improves recovery
- Work swiftly but gently
Feeding and Maintaining Cells
Feeding frequency depends on cell type and growth rate. Typical guidelines:
- Change media every 2–3 days or when yellow
- Passage at 70–90% confluency. To learn more about confluency and how to measure it read our full guide here
- Monitor pH with phenol red
Quick Tips
- Label flasks with cell type, passage number, and date
- Take images for records. (Or old-fashioned tip, draw your cells 2-3 times so you understand their morphology)
- Frequent complete media changes can sometimes impair cell growth, as cells may secrete autocrine and paracrine factors that support their own proliferation and survival. In certain contexts—especially with sensitive or slow-growing cells—adding fresh media (supplementing) rather than fully replacing it can help preserve these beneficial factors while still replenishing nutrients and maintaining pH balance.
- When culturing cells in small vessels (e.g., 96-well or 24-well plates), ensure that each well contains an adequate volume of media to minimize edge or “border” effects. Insufficient media volume can lead to increased evaporation at the edges, causing variability in cell growth and experimental outcomes.
Passaging and trypsinization
Subculturing, or passaging, is a routine yet essential part of maintaining healthy adherent cell cultures. As cells proliferate, they eventually reach a point where they cover most of the culture surface—a stage called confluent. If left unpassaged, cells can become overcrowded, nutrient-deprived, and stressed, leading to altered behavior or cell death. To maintain healthy growth and experimental consistency, cells must be detached and reseeded into new vessels.
Trypsinization is the most common method for detaching adherent cells. Trypsin is a serine protease that breaks down peptide bonds in adhesion proteins that anchor cells to the culture surface. It is often used in combination with EDTA (ethylenediaminetetraacetic acid), a chelating agent that binds calcium and magnesium ions—essential cofactors for many cell adhesion molecules. By removing these ions, EDTA weakens cell-cell and cell-surface interactions, allowing trypsin to act more effectively.
After detachment, cells should be accurately counted using a hemocytometer, SnapCyte, or an automated cell counter. You can also use a split ratio (e.g., 1:3 or 1:5) instead of an exact cell count, provided it has been previously optimized for your culture conditions.
- Initial Seeding Guidelines
A general rule of thumb is to seed at 20–30% confluency, allowing cells to reach 70–90% confluency within 2–3 days—depending on their doubling time and vessel format.
- Standardization Strategy
To determine optimal seeding density:
- Seed a range of cell numbers in your vessel of interest.
- Identify the condition that leads to rapid entry into the log (linear) growth phase.
- Once established, maintain consistency by using the same seeding ratio and confluency targets at each passage.
- Avoid Sparse Seeding
Seeding too sparsely can lead to clonal growth, where cells grow in isolated colonies. In such cases:
- Only peripheral cells divide actively.
- Growth is slower.
- Cell phenotype may shift due to low-density stress.
- Passage tracking may become inaccurate, as cells may divide multiple times before reaching 70–80% confluency.
Practical Example: For Cell Line A (doubling time: ~48 hours), you always passage at 70–80% confluency, using a 1:3 split ratio to reset confluency to ~25–30%. You monitor growth using image-based confluency analysis (e.g., SnapCyte) and follow a regular schedule—typically passaging every Monday and Thursday.
- Scaling Across Vessels
When switching to a new vessel format (e.g., from a T25 to a T75 flask), use the surface area ratio to scale your cell numbers accordingly. This preserves consistency in confluency and growth behavior across formats.
Recommended Volumes, Surface Areas, and Seeding Estimates (HeLa Cell Example)
Vessel | Area (cm²) | Media Volume | Trypsin Volume | Cells (100% Confluency) |
6‑well plate | ~9.5 | 1–3 mL | 1 mL | 0.3–1.2 × 10⁶ cells/well |
12‑well plate | ~3.8 | 1–2 mL | 0.4–1 mL | 0.1–0.5 × 10⁶ cells/well |
24‑well plate | ~2.0 | 0.5–1 mL | 0.2–0.3 mL | 0.05–0.24 × 10⁶ cells/well |
96‑well plate | ~0.3 | 0.1–0.2 mL | 0.05–0.1 mL | 0.01–0.04 × 10⁶ cells/well |
10 cm (100 mm) dish | ~55–57 | ~12 mL | ~5 mL | ~2.2 × 10⁶ cells/dish |
T25 flask | 25 | 3–5 mL | 3 mL | ~0.7–2.8 × 10⁶ cells/flask |
T75 flask | 75 | 5–15 mL | 5 mL | ~2.1–8.4 × 10⁶ cells/flask |
Protocol Summary:
- Aspirate spent medium and gently rinse cells with sterile PBS (without calcium and magnesium) to remove residual serum proteins that inhibit trypsin.
- Add enough trypsin-EDTA to just cover the cell monolayer.
- Incubate at 37°C for 2–5 minutes. Check frequently under a microscope for cell rounding and detachment.
- Gently tap or shake the flask to dislodge remaining cells if necessary.
- Neutralize trypsin by adding 5–10x volume of complete media containing serum.
- Collect and centrifuge cells at 300g for 5 minutes (optional for sensitive applications).
- Resuspend cells in fresh media and seed into new flasks or plates at an appropriate split ratio (commonly 1:3 to 1:5)
Quick Tips
- Never exceed 10 minutes of trypsin exposure to avoid damage to surface receptors or enzymes important for your experiment.
- For sensitive cell types (e.g., stem cells, primary neurons), consider gentler alternatives such as Accutase, TrypLE Express, or enzyme-free dissociation buffers.
- Some cells do not tolerate trypsin well and may require mechanical scraping using a sterile rubber scraper, though this method can be harsh and result in cell clumping or damage.
Tracking confluency, cell count and doubling time
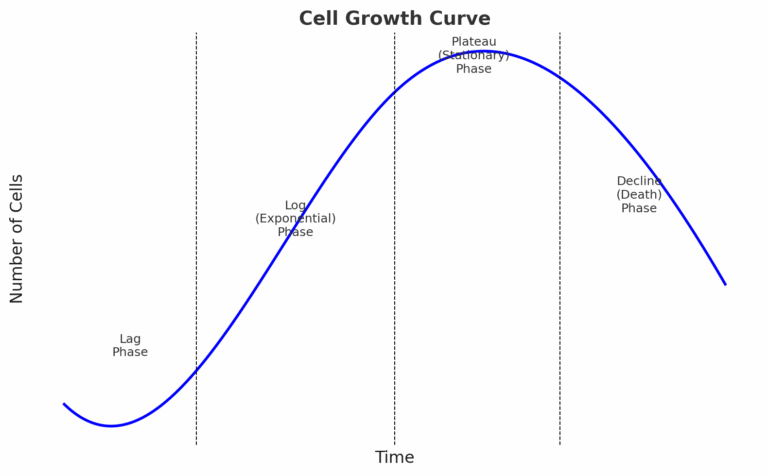
Cell proliferation in culture typically follows a characteristic growth curve consisting of four main phases:
- Lag Phase: Cells adapt to their new environment; minimal division occurs.
- Log (Exponential) Phase: Cells divide rapidly at a constant rate—this is the linear growth phase and the only suitable window for calculating doubling time and performing most functional assays.
- Plateau (Stationary) Phase: Growth slows as nutrients deplete and waste accumulates; cells reach confluency.
- Decline (Death) Phase: Cell death exceeds proliferation, often due to over-confluency or environmental stress.
Note: Only the logarithmic (log) phase provides reliable data for calculating doubling time and studying cell proliferation or drug response. During this phase, cell count and confluency are linearly correlated. For a deeper explanation, read our guide to cell confluency and when it can mislead. In contrast, the lag, plateau, and decline phases are unsuitable due to non-linear cell behavior.
Calculate doubling time (DT) when receiving new cell lines and reassess regularly. For formulas and examples, see our full cell doubling time calculator and PDL guide.
Best Practices:
- Perform calculations during the linear (log) growth phase, not during lag or plateau phases.
- Use direct cell counts for suspension cultures.
- For adherent cells, use confluency estimates or adherent cell counts.
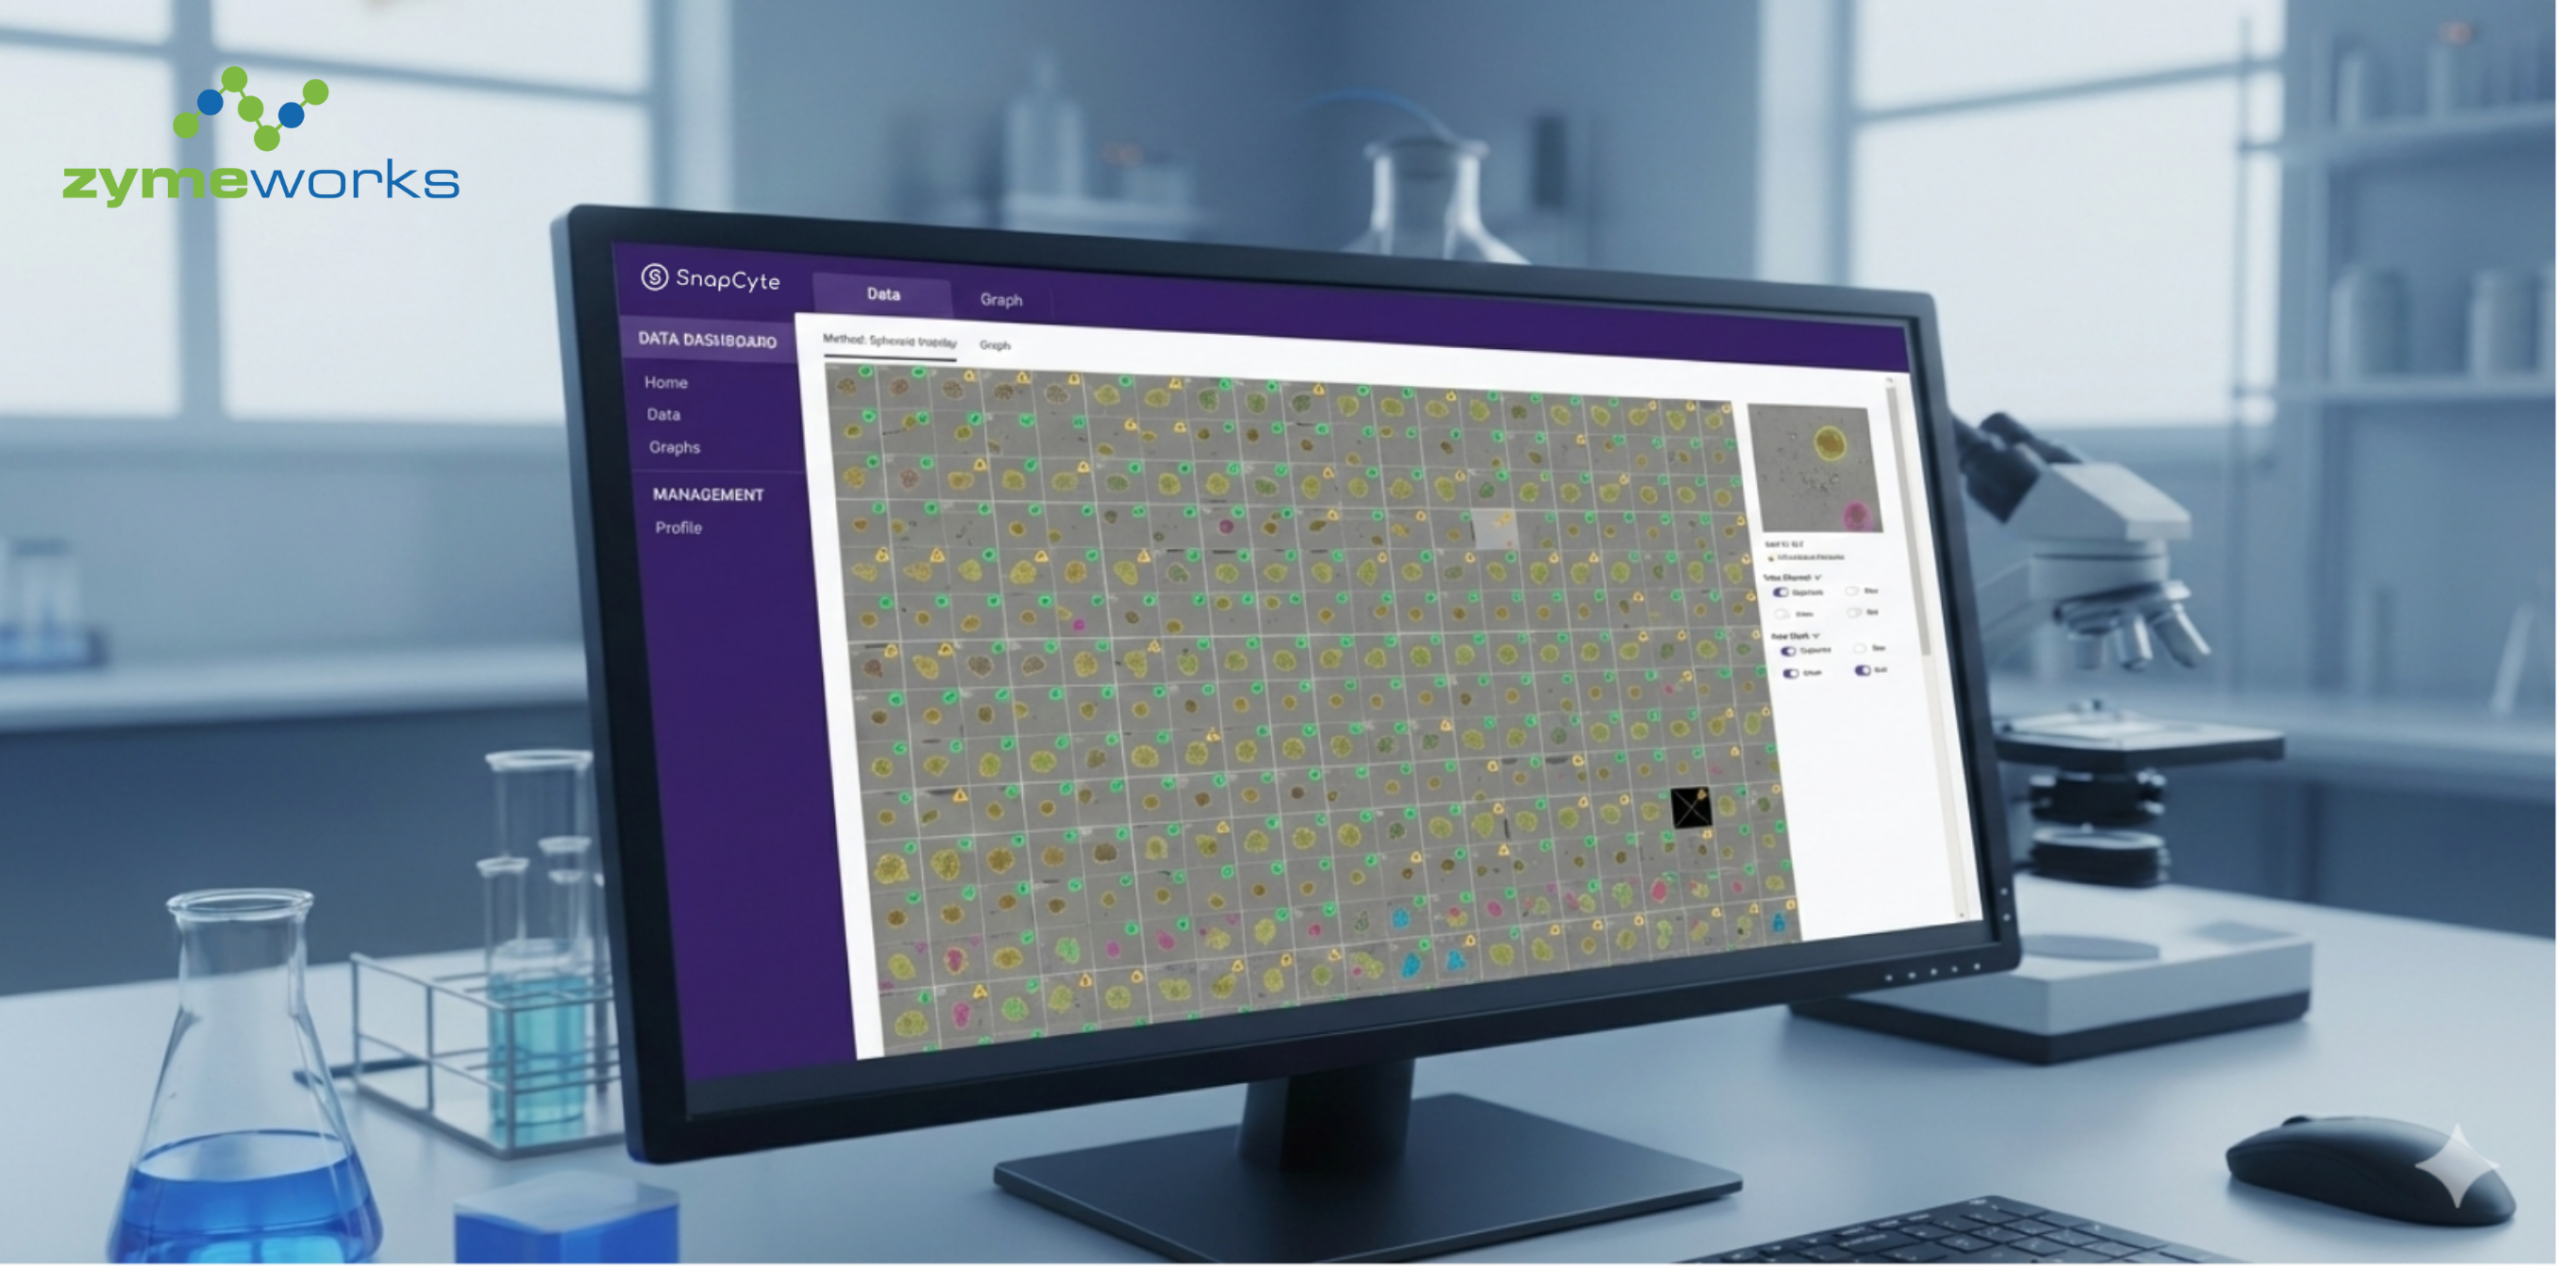
→ Tools like SnapCyte (free AI software) can measure cell confluency and adherent cell count from any vessel ( no need to set-up an experiment for DT)

Want a faster way to track cell growth and confluency?
SnapCyte® measures confluency and adherent cell count from microscopy images, helping researchers monitor cell growth without relying on manual estimates or destructive counting.
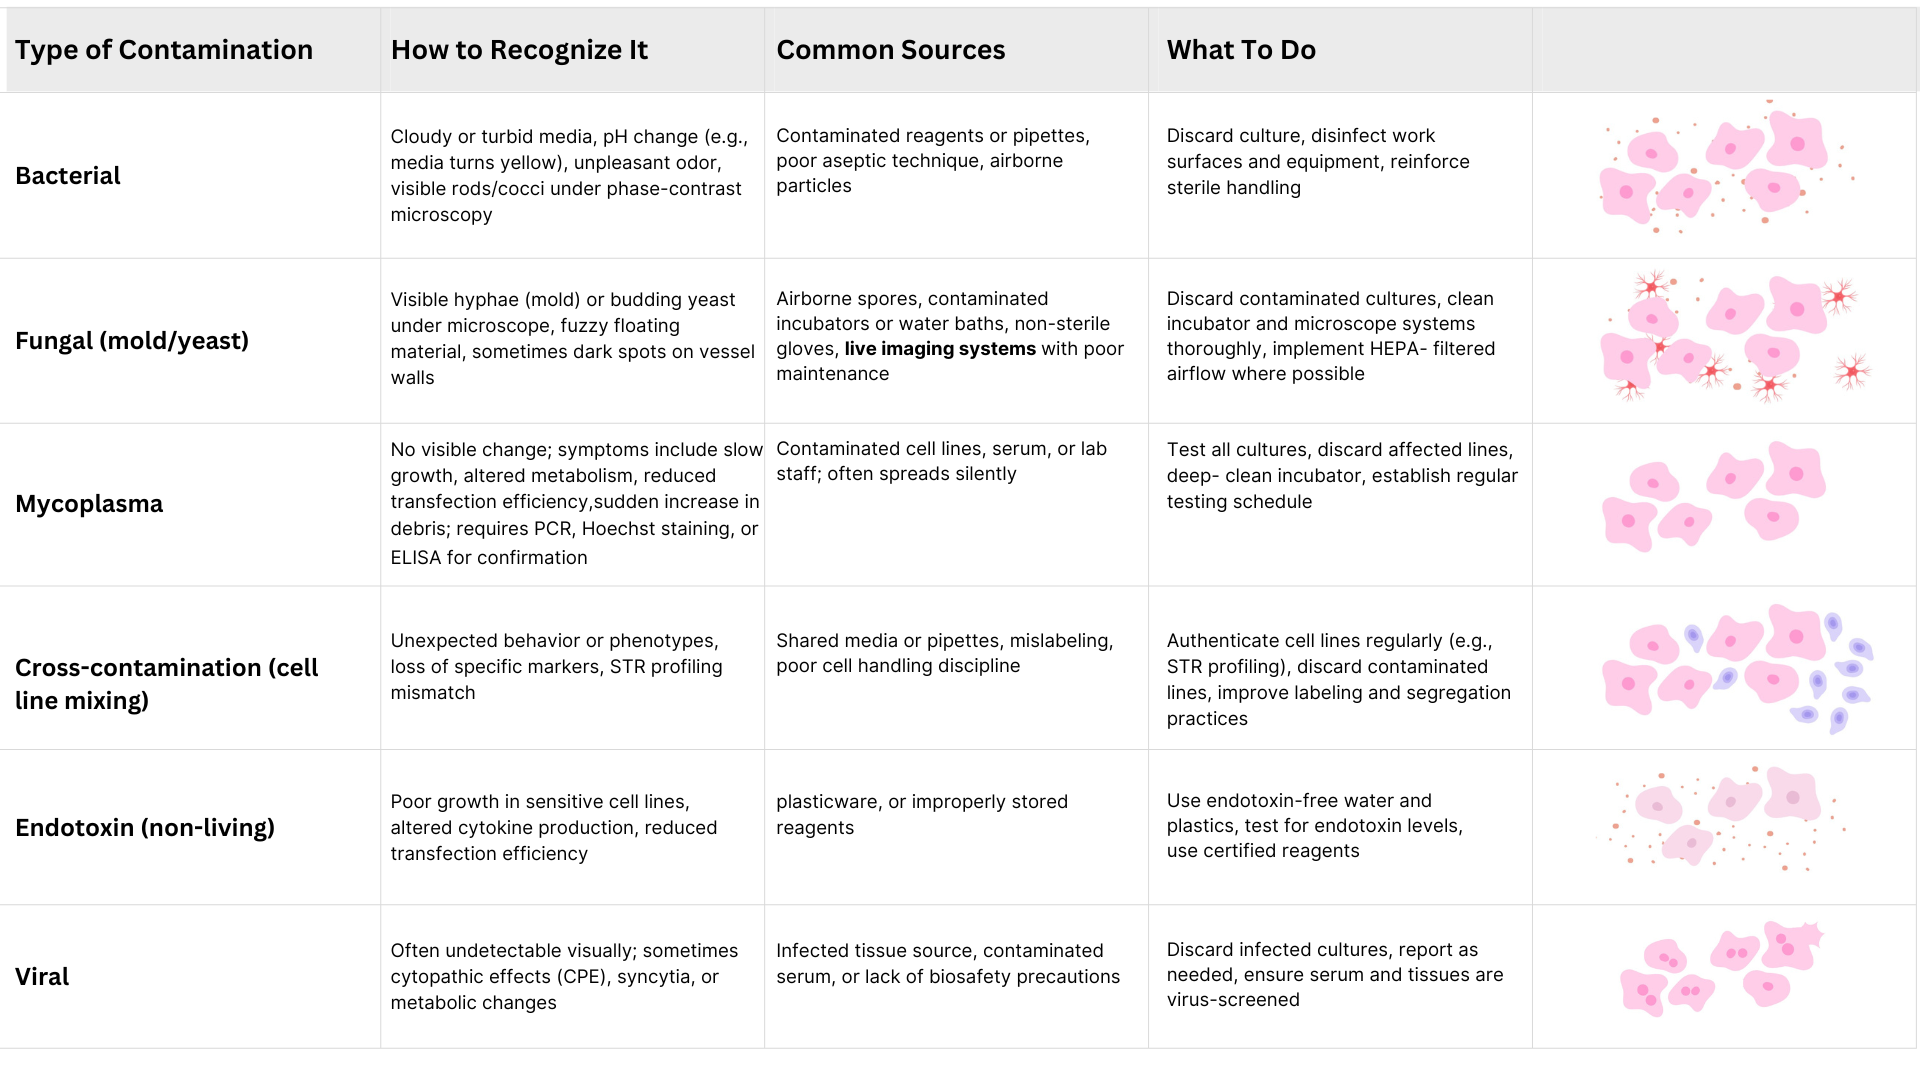
Contamination and troubleshooting
Contamination remains one of the most persistent and damaging problems in cell culture, potentially compromising months of work and leading to irreproducible or invalid data. Contaminants may be biological—such as bacteria, fungi, mycoplasma, and viruses—or technical, such as endotoxins and cross-contamination from other cell lines. Early identification and prompt action are essential to maintaining the integrity of your cultures. Below is a comprehensive summary of the main types of contamination, how to recognize them, their likely sources, and how to manage each case effectively.
Troubleshooting Common Problems
Issue | Possible Cause | Fix |
|---|---|---|
Cells not attaching | Cold media, uncoated plastic | Warm media, use coated surfaces |
Contamination | Microbial | Discard, disinfect, autoclave waste |
Slow growth | Old passage, low nutrients | Use fresh media, check CO₂ levels |
Cells clump in well | Small volume, cold media | Increase volume, warm & mix gently |
Final Thoughts
Mastering cell culture takes patience, precision, and practice.
- Keep a detailed lab notebook
- Document cell morphology (photo or drawing)
- Follow aseptic technique without compromise
- Ask experienced colleagues when in doubt
- Keep a printed protocol nearby—download our one-page PDF for quick reference in the lab
References
Bone and Cancer Research Trust. Cell Culture Vessel Surface Area and Seeding Density. [PDF] Available at: https://boneandcancer.org/…/E1A-Cell-Culture-Vessel-Surface-Area-and-Seeding-Density.pdf
iGEM Uppsala University. UU Cell Culture Protocol. [PDF] Available at: https://static.igem.org/mediawiki/2017/2/2e/UU_Cell_culture_protocol.pdf
Thermo Fisher Scientific. Useful Numbers in Cell Culture Protocols. Available at: https://www.thermofisher.com/…/cell-culture-useful-numbers.html
Corning Life Sciences. Application Note: Surface Area and Recommended Working Volumes for Corning Vessels. Available at: https://www.corning.com/…/CLS-AN-209.pdf
Ubigene Biosciences. HeLa Cell Line Instruction Manual. Available at: https://www.ubigene.us/…/Cell%20Use%20Instruction%20-%20Hela%20Cell%20Line.pdf
Sigma-Aldrich. Cell Dissociation with Trypsin Protocol. Available at: https://www.sigmaaldrich.com/…/cell-dissociation-with-trypsin
✅ Ready to simplify your cell culture workflow?
Try it now and use AI to standardize your cell culture analysis.
Nader Al Nakouzi, PhD
I am a cancer biologist and translational researcher with experience in cell culture, microscopy, image-based assays, and therapeutic development. My work focuses on understanding complex biological systems and improving how experimental data is measured, interpreted, and translated into meaningful decisions.

")
")
")